Docs
Everything you need to go live. Three steps, no special software.
Create an account, then add Twitch, YouTube, Kick, or any custom RTMP endpoint from the dashboard. Paste each platform's stream key once. You can switch destinations on and off whenever you like, even mid-stream.
Your dashboard shows your ingest URL and your PSiStream stream key. In OBS (or Streamlabs, or any encoder) open Settings → Stream, set Service to Twitch, then under Server choose Specify Custom Server... and paste your ingest URL as the custom server and your key as Stream Key. Leave Enhanced Broadcasting unchecked.
Hit Start Streaming. PSiStream relays your stream to every enabled destination at once, and the dashboard shows each destination's health in real time.
Go live on Twitch, YouTube, Kick, and more at the same time, from one OBS. This assumes your account is already active. If your dashboard still shows an Activate card, redeem your beta code or subscribe first.
You point OBS at PSiStream by setting Service to Twitch and then choosing a custom server (Step 3); this works no matter which platforms you relay to. Picking the Twitch service can switch on Enhanced Broadcasting (newer OBS: Multitrack Video), which streams straight to Twitch and cannot be relayed, so OBS fails with "Could not access the specified channel or stream key". In Settings → Stream, leave it unchecked.
- On your dashboard, open the Connect your encoder card.
- Use the key already there, or click Create Key and give it a label.
- A new key is shown only once in a green banner, so copy it and keep it safe.
- Your Server URL sits next to each key (for example
rtmp://ingest.psistream.com/live/), picked automatically for the region closest to you. Press Ctrl+Shift+S to copy it. - This PSiStream key goes in OBS, not your Twitch or YouTube key.
- In the Destinations card, click Add a destination for each platform you want.
- Pick the platform, add a label, and paste that platform's stream key (Twitch from the Twitch Creator Dashboard, YouTube from YouTube Studio, Kick from the Kick Dashboard, and so on).
- The server is filled in for known platforms; TikTok and Custom need their own server URL.
- Repeat for every destination. Your plan sets how many you can enable at once, and a banner warns you if you are over.
- Toggle destinations on and off any time, even mid-stream.
- In OBS (or Streamlabs, or any encoder), open Settings → Stream.
- Set Service to Twitch.
- Under Server, choose Specify Custom Server..., then paste your Server URL into Custom Server and your PSiStream stream key into Stream Key.
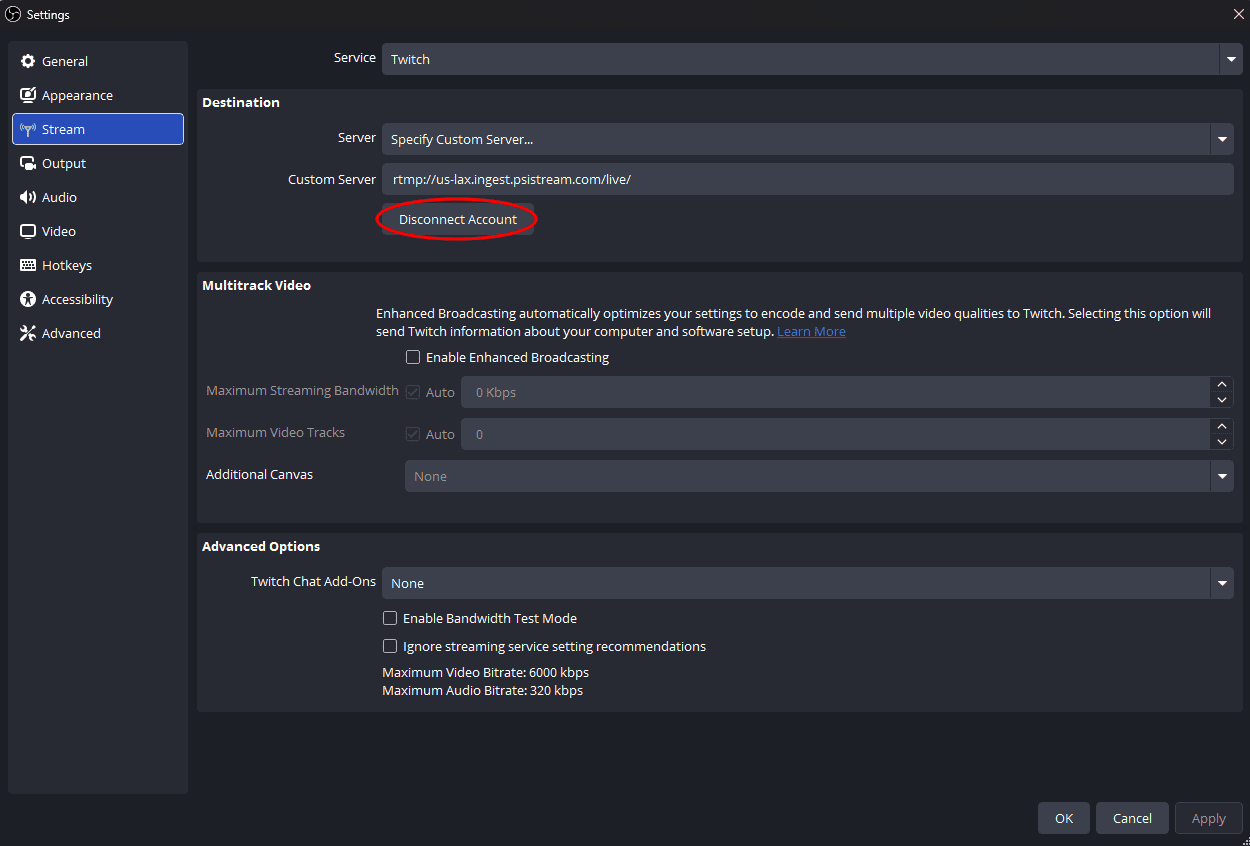
- If OBS shows a Disconnect Account button instead of a Stream Key field, press it first.
- In Settings → Output, set a bitrate your upload can handle (the pre-flight check recommends one), then click OK.
- Back on the dashboard, run the Pre-flight check (shown while you are offline).
- It runs five checks: account ready, connection test (ping and upload speed), recommended OBS settings, destinations reachable, and a live rehearsal.
- In the rehearsal, use Test privately to receive your stream without relaying it, confirm the quality looks right, then re-enable your destinations.
- This catches problems before you are live.
- Hit Start Streaming in OBS.
- The Live Status card switches to Live Now and shows your ingest quality (resolution, frame rate, bitrate, audio and video tracks), total egress, and the node region.
- Each destination shows a health dot and its output bitrate; green means it is relaying.
- A failed destination shows an error and a Retry button.
- To stop, press Stop Streaming in OBS.
- If your connection drops, PSiStream keeps your destinations alive for your reconnect grace window (default 45 seconds, adjustable per key), so a brief blip does not end your stream.
Want a music-free track on YouTube or an unmuted Twitch VOD? Turn on Audio Track 2 on a destination, or read the Twitch multitrack guide below.
YouTube needs a broadcast waiting before it will publish anything, so a stream key on its own is not enough. Read Going live on YouTube below before your first YouTube stream.
Adding your YouTube stream key to PSiStream is only half the setup. YouTube also needs a broadcast waiting to receive it, or your stream arrives and is never published.
YouTube keeps your ingest (the stream key) and your broadcast (the public watch page) as two separate things. The key accepts the connection either way, so PSiStream shows the destination as healthy and relaying, and your channel still shows nothing. Make sure a broadcast is waiting before you hit Start Streaming.
- In YouTube Studio, open Create → Go live, then the Manage tab.
- Click Schedule stream and set the title, visibility, and start time.
- Copy that broadcast's stream key into your PSiStream YouTube destination.
- The broadcast now sits waiting for your stream, so you can go live from OBS without opening YouTube again.
- In YouTube Studio, open Create → Go live and stay on the Stream tab.
- Start streaming from OBS. YouTube attaches a broadcast to the reusable key while you are on that page, and your preview appears there.
- Leave the page open until YouTube confirms you are live.
Your dashboard shows the YouTube destination green with an output bitrate, no error and no Retry button, while YouTube shows no live video. That combination means the relay is doing its job and YouTube has no broadcast bound to your key. Schedule one, or open the Go live page, then start streaming again. The same applies to any platform that separates the key from the broadcast.
A compact, read-only panel inside OBS that mirrors your dashboard Live Status: ingest quality, each destination's health, and reconnects, without leaving OBS. It is read-only. It can show your stats and spin up a node, and it cannot change anything else on your account.
- In OBS, open Docks → Custom Browser Docks.
- Give it a name (for example PSiStream) and paste the dock URL, which is shown in Settings → OBS status dock (
https://psistream.com/obs/live.html). Click Apply. - Dock it wherever you like. It asks for a token, then shows Offline until you go live.
- In Settings → OBS status dock, click Generate token and copy it. It is a password, shown only once.
- Paste it into the dock's token box. The panel then shows your live status.
- The token is separate from your login: a login session expires after 15 minutes, but this token does not, so the dock keeps working.
- Back in Settings → OBS status dock, click Revoke to disable the token immediately.
- Generating a new token also replaces the old one, so an old dock stops working.
Set up multitrack audio in OBS.
Picking the Twitch service can switch on Enhanced Broadcasting (newer OBS: Multitrack Video). It streams straight to Twitch and cannot be relayed, so OBS fails to connect with "Could not access the specified channel or stream key". In Settings → Stream, leave it unchecked. PSiStream still relays your multitrack audio to Twitch.
In OBS, click Settings in the bottom-right Controls panel.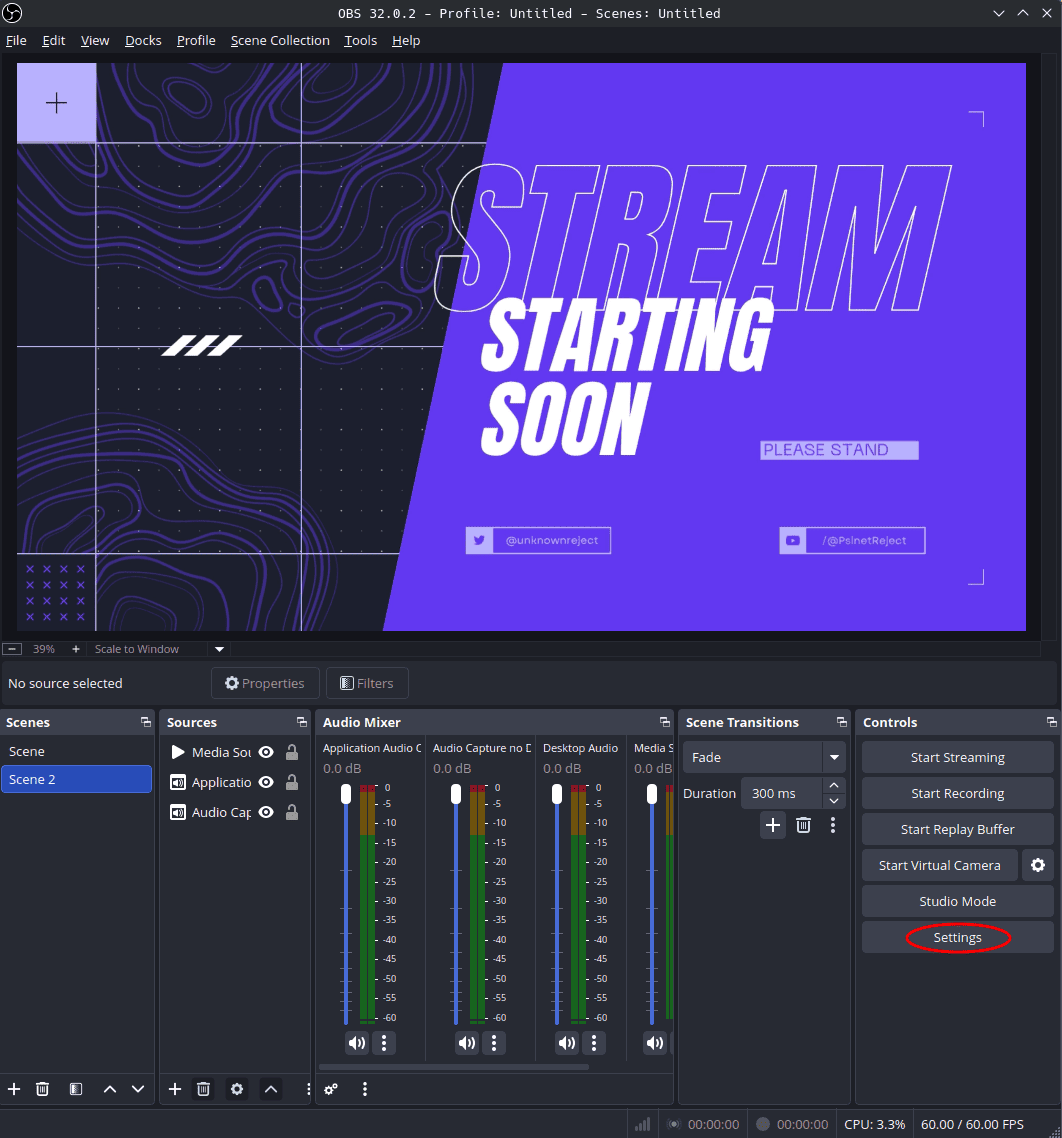
In the Settings window, select Stream from the left sidebar.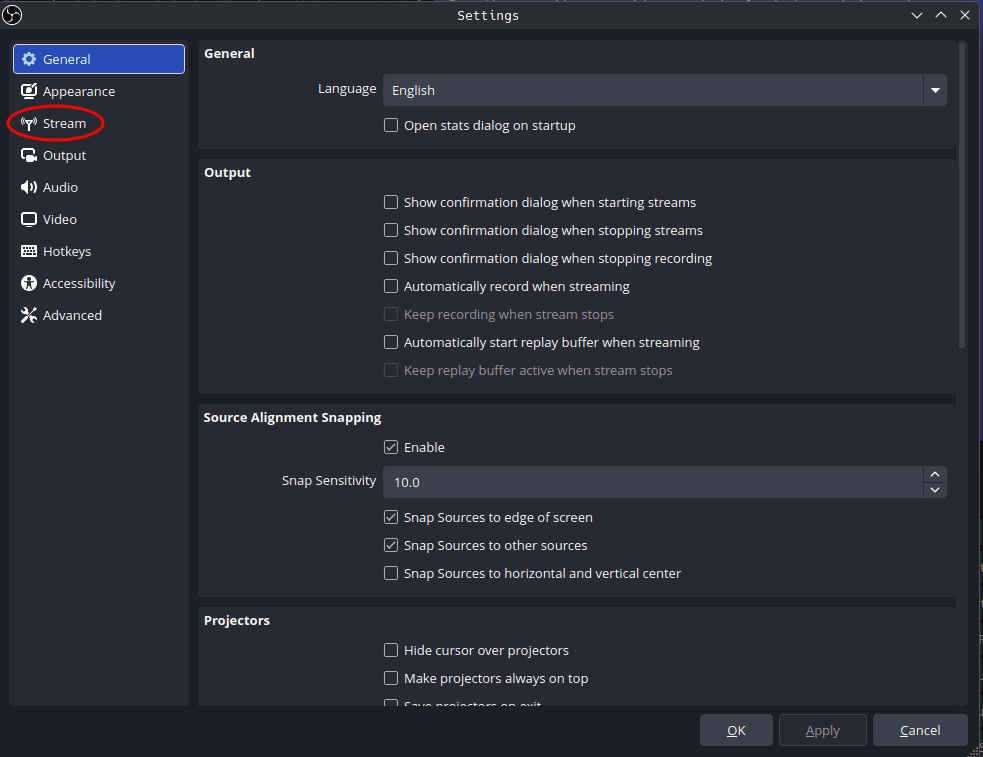
Set Service to Twitch. Under Destination, set Server to Specify Custom Server..., paste your PSiStream ingest URL into Custom Server, and paste your PSiStream stream key into Stream Key.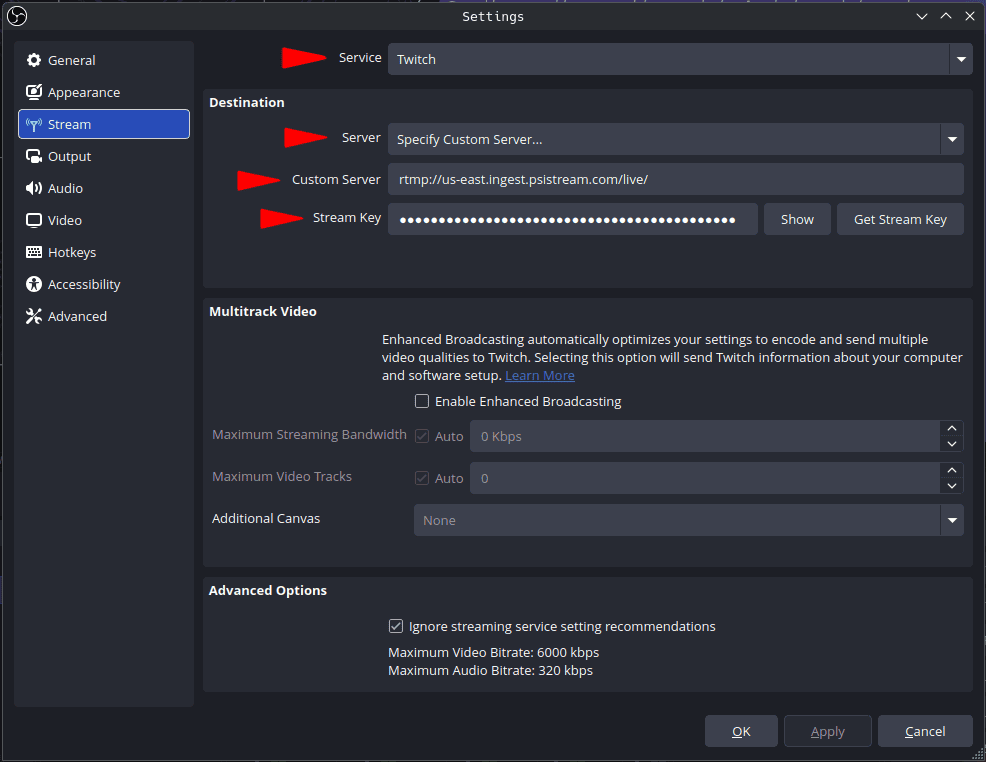
If the Stream tab shows a Disconnect Account button instead of a Stream Key field, your Twitch account is linked inside OBS. Press Disconnect Account so you can enter the custom server and your PSiStream stream key.
Last step: back in Settings → Audio, enable the second audio track to send the music-free version Twitch uses for VOD playback.
Your destinations stay live through a reconnect grace window. Get back online within it and viewers see a brief hiccup, not an ended stream.
Each destination runs in isolation. If one platform drops the relay, the others and your ingest keep going. Failed destinations retry automatically and are flagged on the dashboard. Live network health is on the status page.
PSiStream can post to a Discord webhook when you go live (set it up on the Notifications page). The custom message preset expands these tokens:
{destinations}   your enabled destination names, comma separated
{date}           the stream start date in UTC (June 11, 2026)
{time}           the stream start time in UTC (9:30 PM UTC)
A capture of your stream is always attached to the notification when possible.
Skip this unless you're building your own integration. Custom webhooks (configured on the Notifications page) receive a POST with Content-Type: application/json for the events you subscribe to: stream.started, stream.ended, and destination.failed.
{
  "event": "stream.started",
  "timestamp": "2026-06-06T22:00:00.000Z",
  "data": {
    "streamId": "...",
    "destinations": [
      { "id": "...", "label": "Twitch", "platform": "twitch" }
    ]
  }
}
Two headers ship with every delivery: X-Webhook-Event (the event name) and X-Webhook-Signature (an HMAC-SHA256 hex digest of the raw body, keyed with your signing secret). To verify authenticity, compute HMAC-SHA256(secret, body) on your side and compare it to the signature header before trusting the payload.